Foreword
I finished the final screenshots of my “The Amarantos Ritual” environment last week. Along with those, I also created some props showcase and breakdown images. In The Amarantos Ritual - 04 - Crystal Sculpt, I already covered quite a bit of insight and behind-the-scenes early images of how I approached creating the geometry for the Nanite crystal. I also showed many screenshots of the progress on the texturing and my reasoning behind the way I approached it.
In the other ten entries of “The Amarantos Ritual” dev blogs, I showed and told you about everything I wanted when it comes to this project. There are even few parts that are tutorials. As such, I am wrapping up the series. Even though the “Crystal Sculpt” blog above is very detailed, I thought I would create this as a supplement blog to it.
As such if you are interested in creating a crystal prop like it, go over and read entry four, “Crystal Sculpt”, above and then come back here and complement your knowledge with the additional four image breakdowns on the topic. I hope it’s informative and insightful.
Screenshots
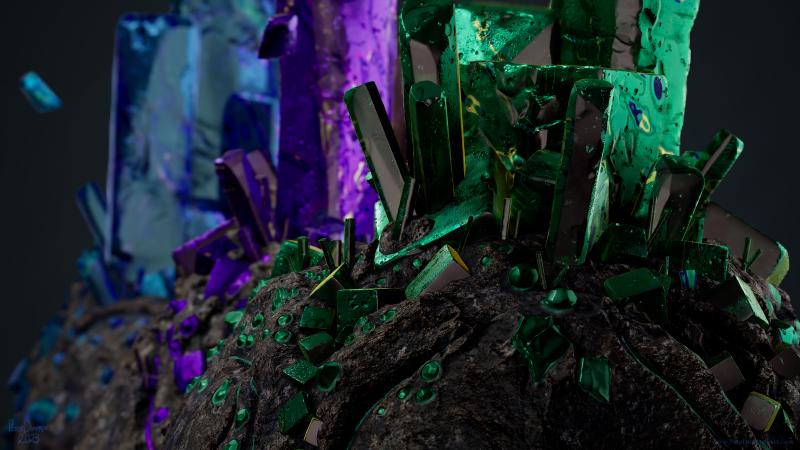
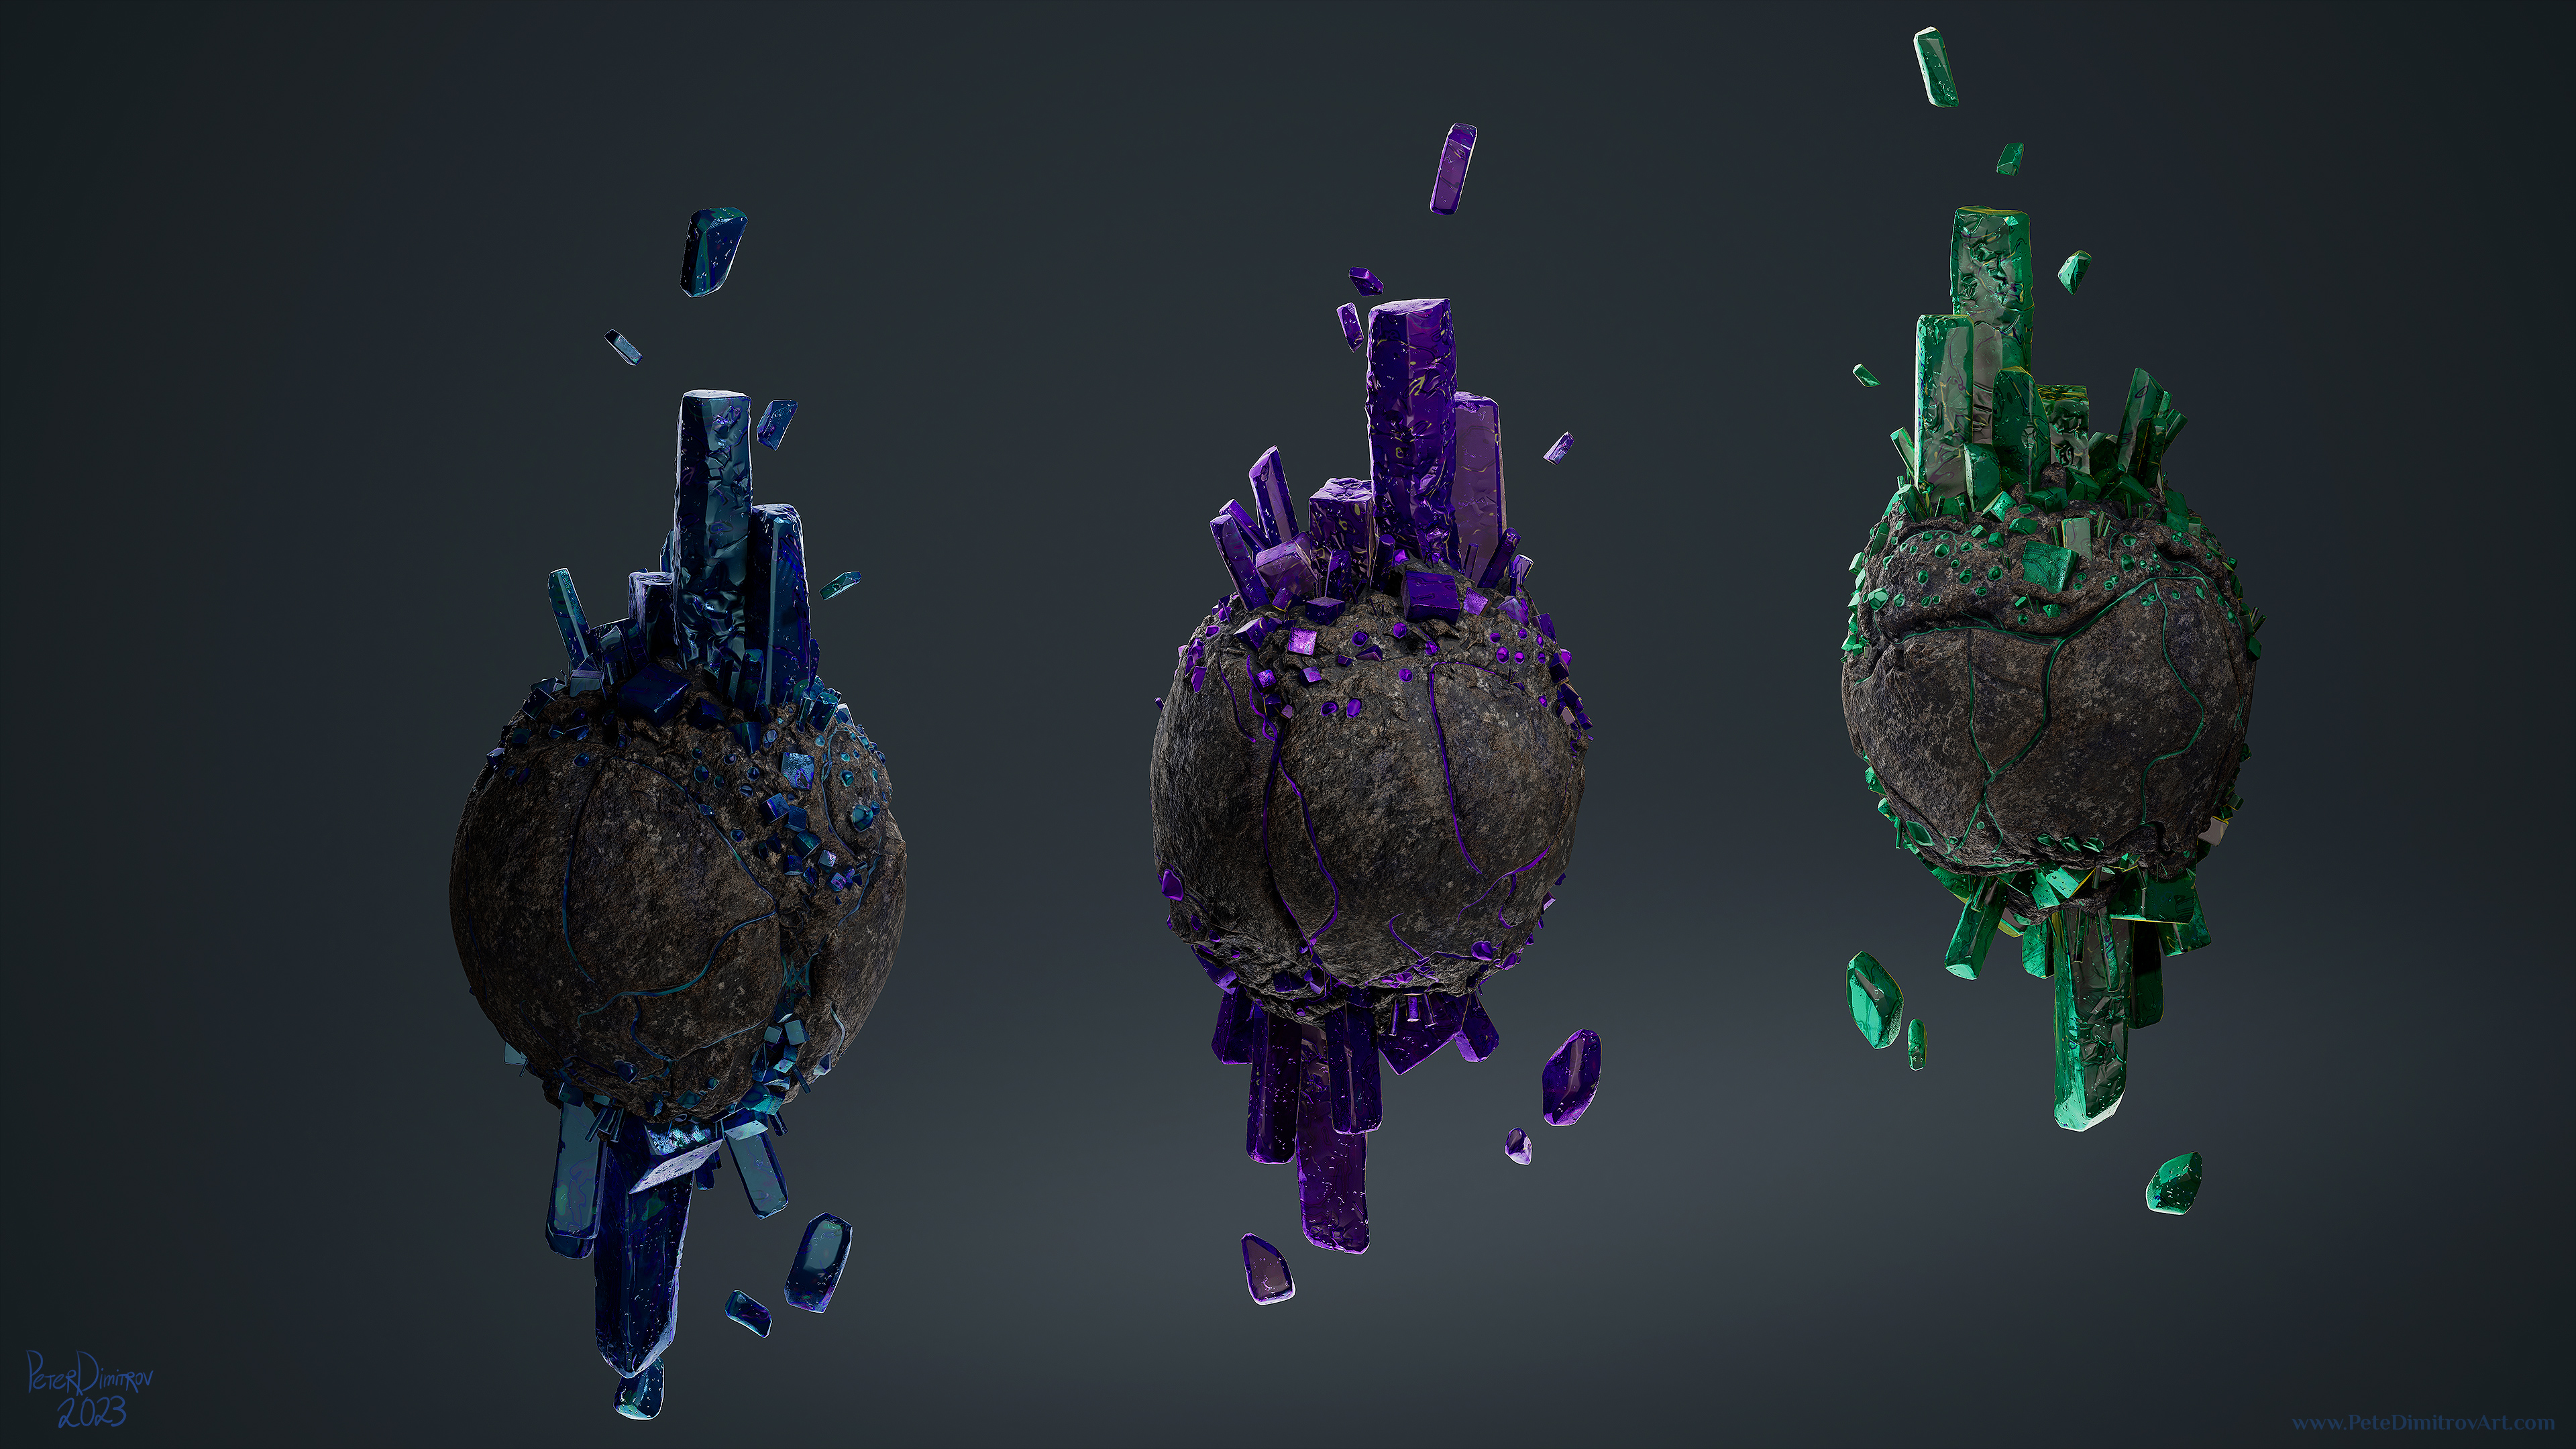
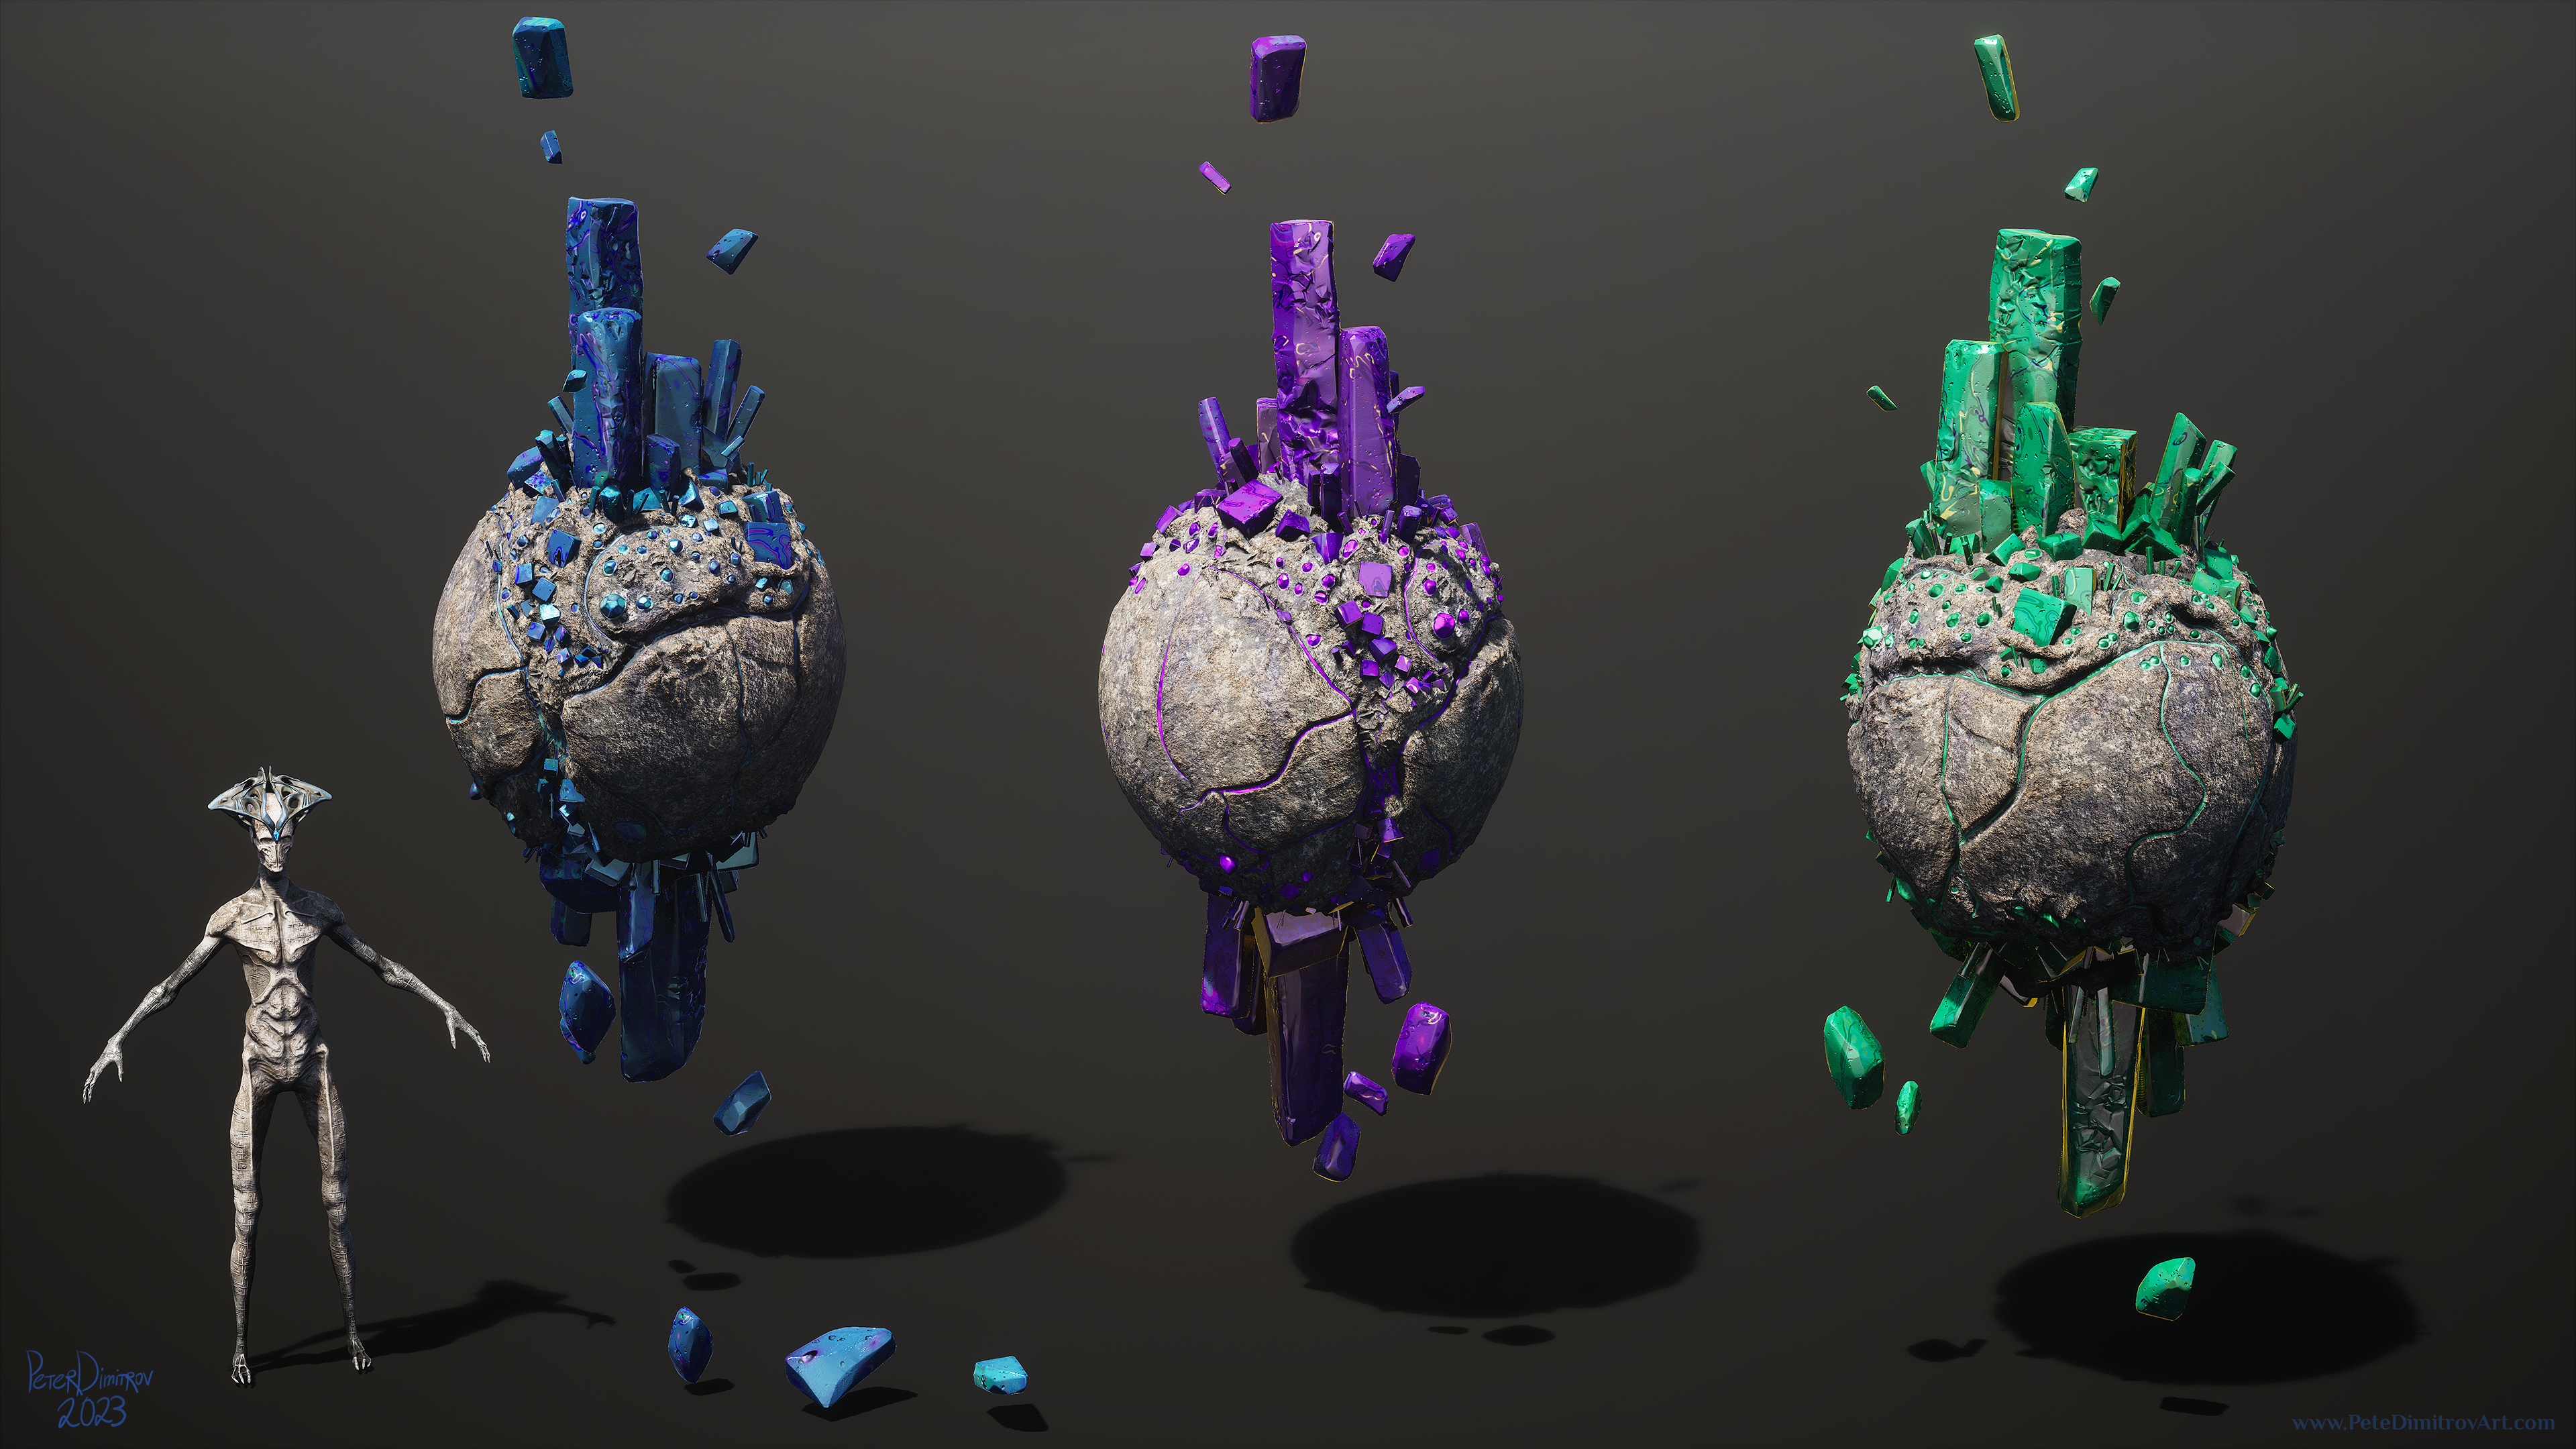
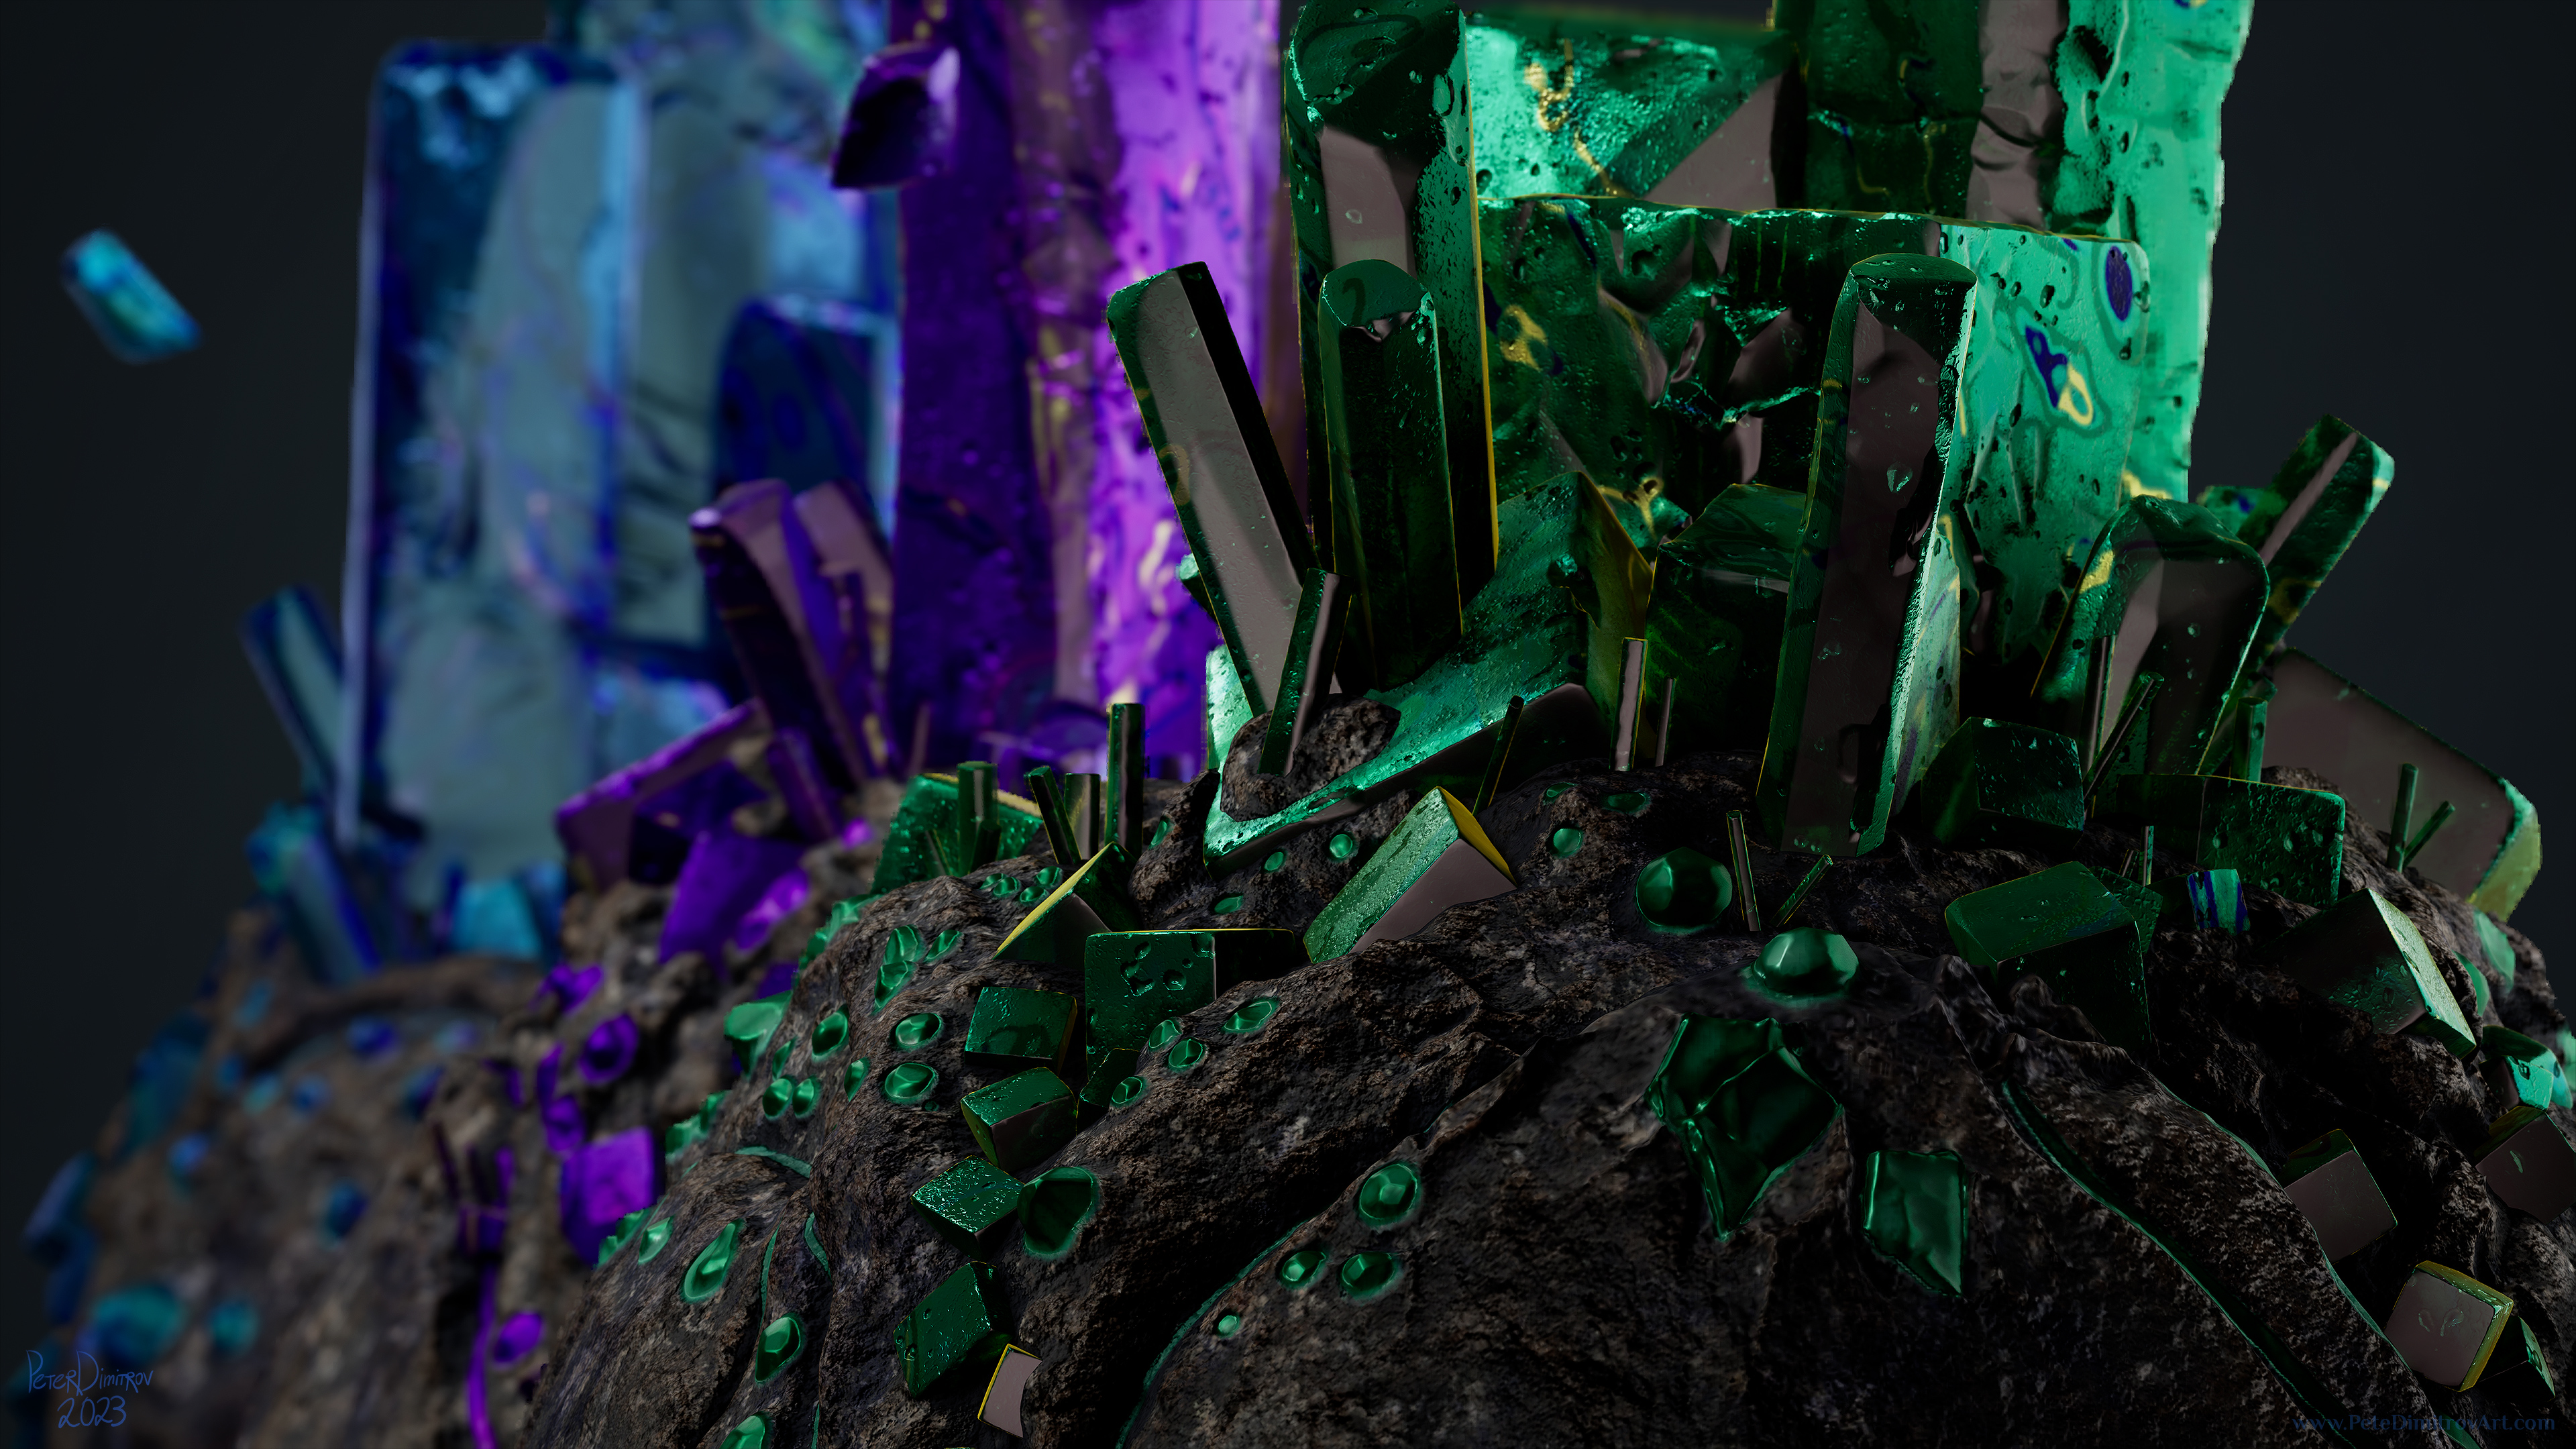
Some screenshots of the final result. This is what we will be inspecting a breakdown of in the images to come.
Breakdown
Text and breakdown behind each image is transcribed below (which was another reason I made this blog post - to transcribe the text for better accessibility).
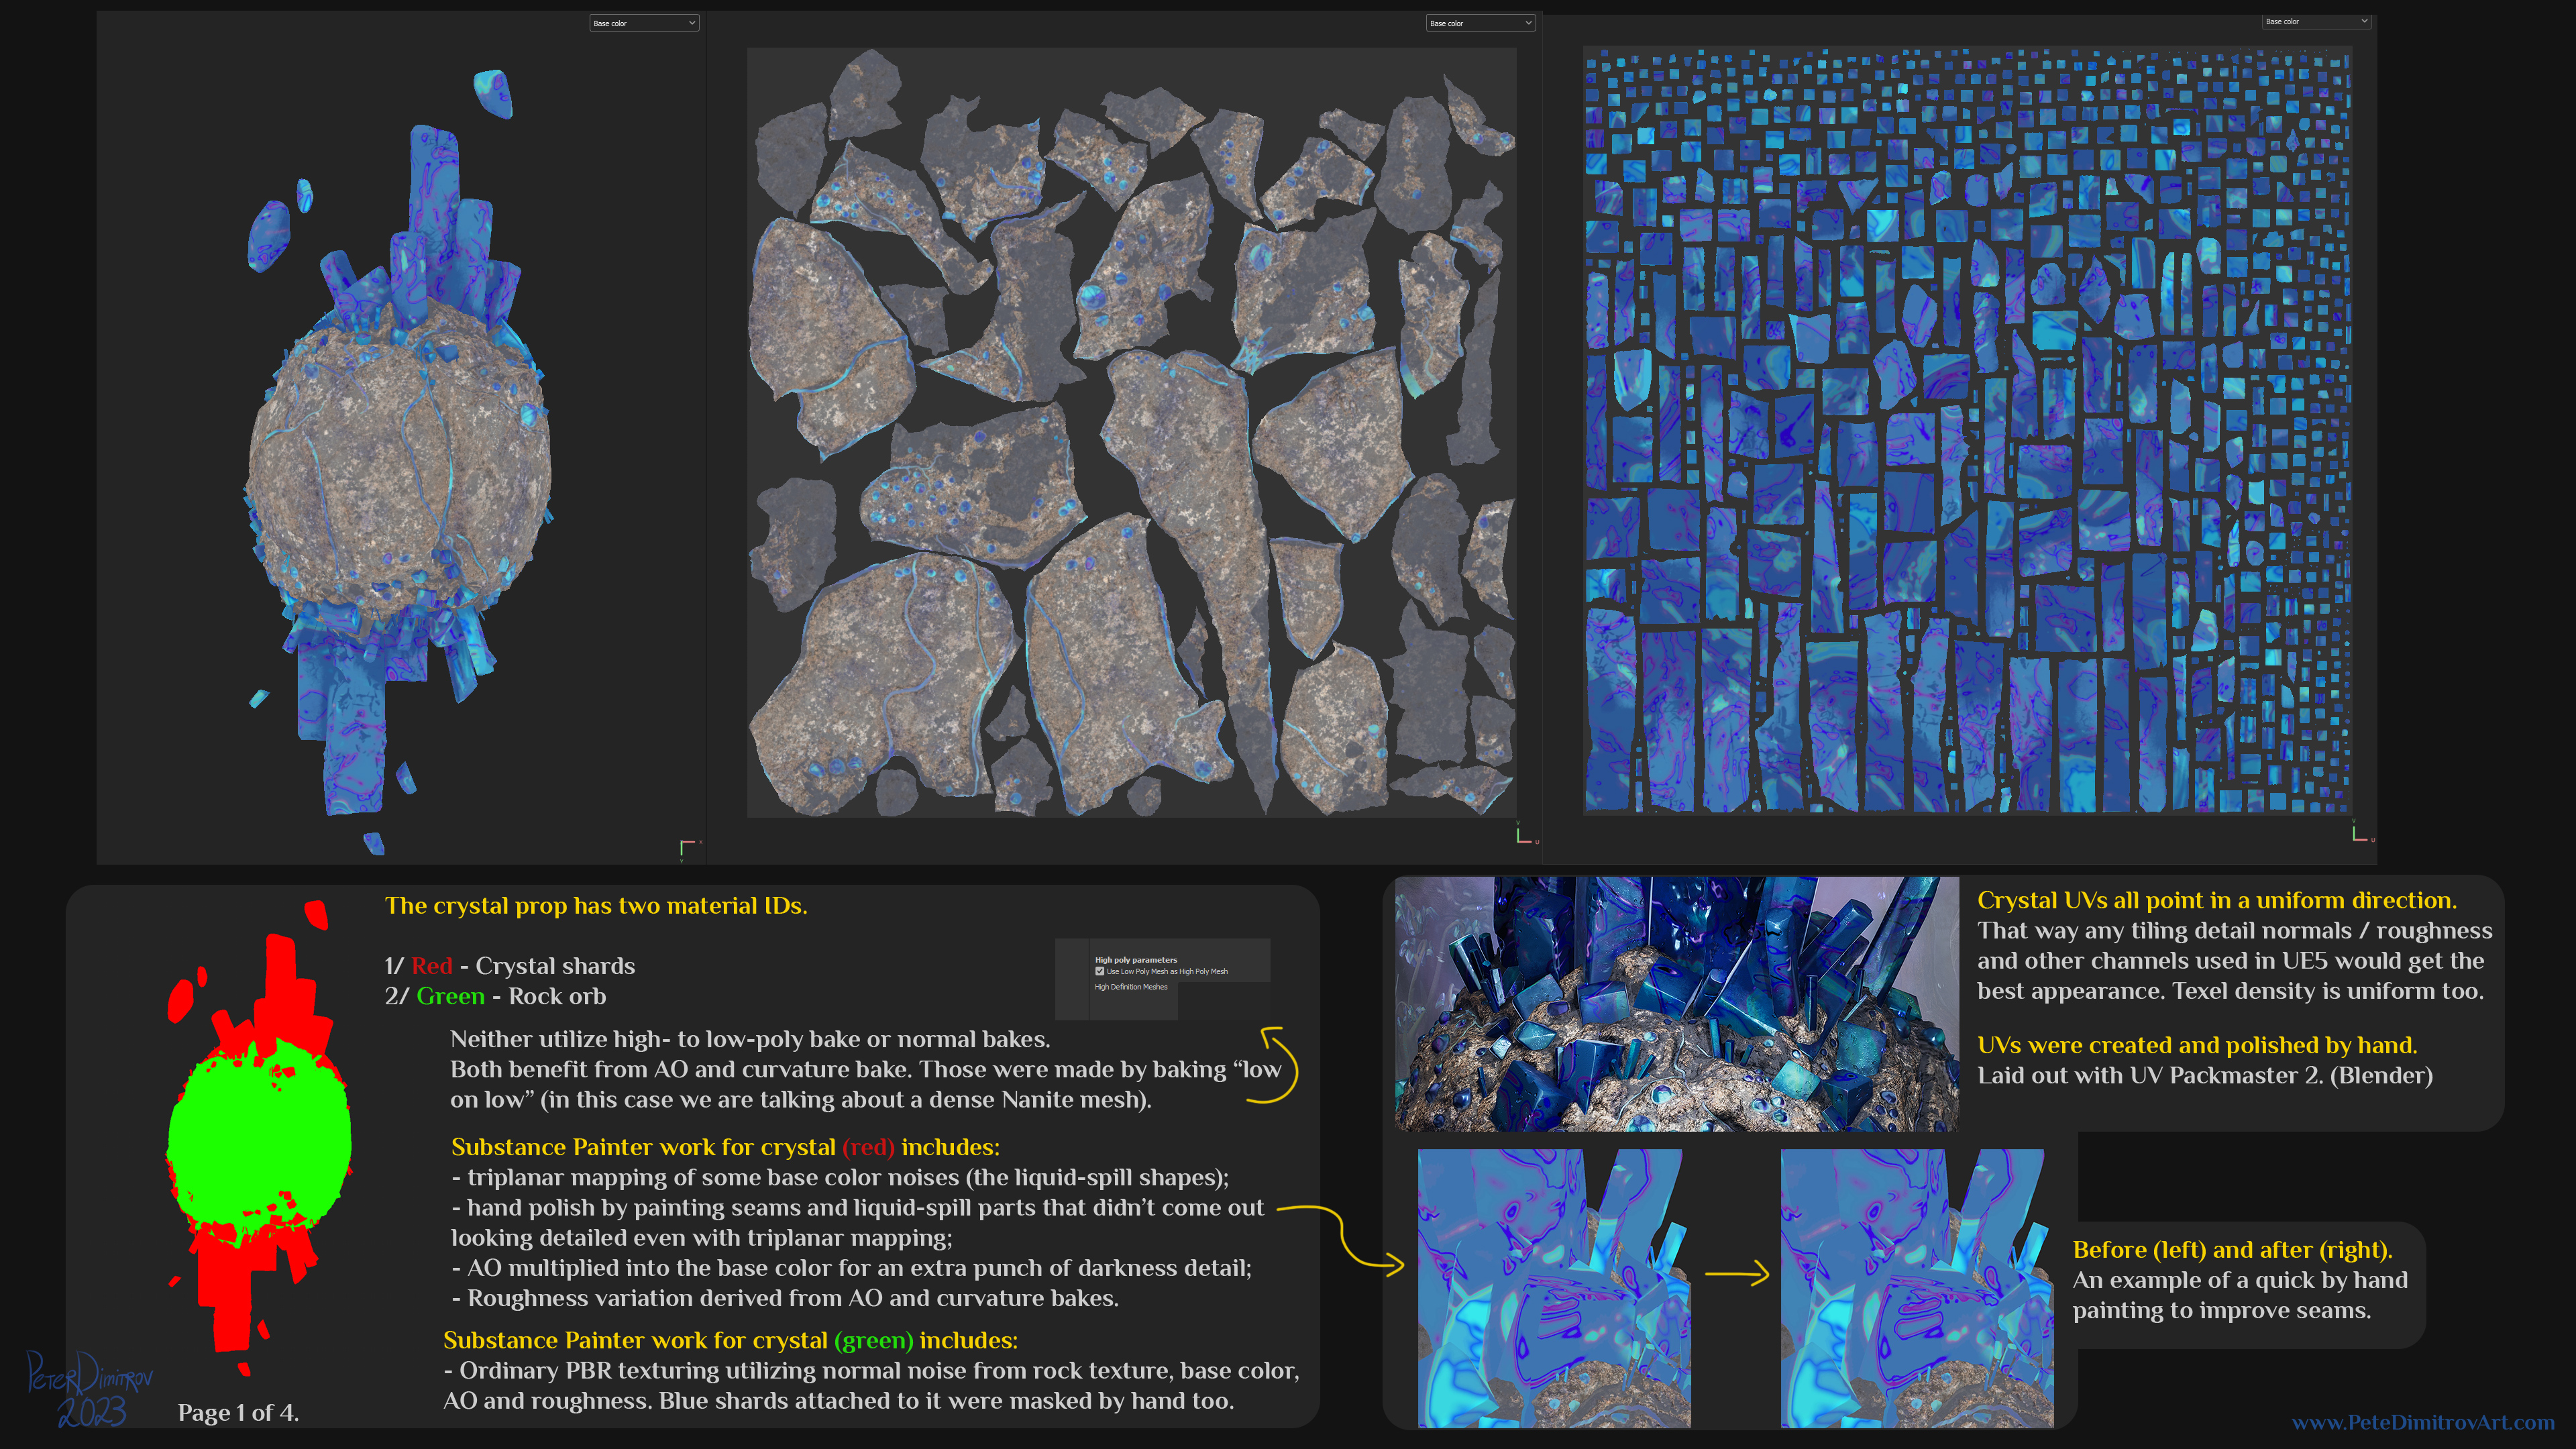
The crystal prop has two material IDs. 1/ Red color - crystal shards. 2/ Green color - rock orb.
Neither utilize high- to low-poly bake or normal bakes. Both benefit from AO and curvature bake. Those were made by baking “low on low” (in this case we are talking about a dense Nanite mesh).
Substance Painter work for crystal (red) includes:
- triplanar mapping of some base color noises (the liquid-spill shapes);
- hand polish by painting seams and liquid-spill parts that didn’t come out looking detailed even with triplanar mapping;
- AO multiplied into the base color for an extra punch of darkness detail;
- Roughness variation derived from AO and curvature bakes.
Substance Painter work for crystal (green) includes:
- Ordinary PBR texturing utilizing normal noise from rock texture, base color, AO and roughness. Blue shards attached to it were masked by hand too.
The image above then shows a close up of the blue crystal, rendered in UE5. Text next to it reads:
Crystal UVs all point in a uniform direction. That way any tiling detail normals / roughness and other channels used in UE5 would get the best appearance. Texel density is uniform too. UVs were created and polished by hand. Laid out with UV Packmaster 2. (Blender)
Final two images in the picture above then show an albedo close up of the patterns painted on the crystal. In the first image there are seams, in the second one they are painted away. Text next to those reads:
Before (left) and after (right). An example of a quick by hand painting to improve seams.
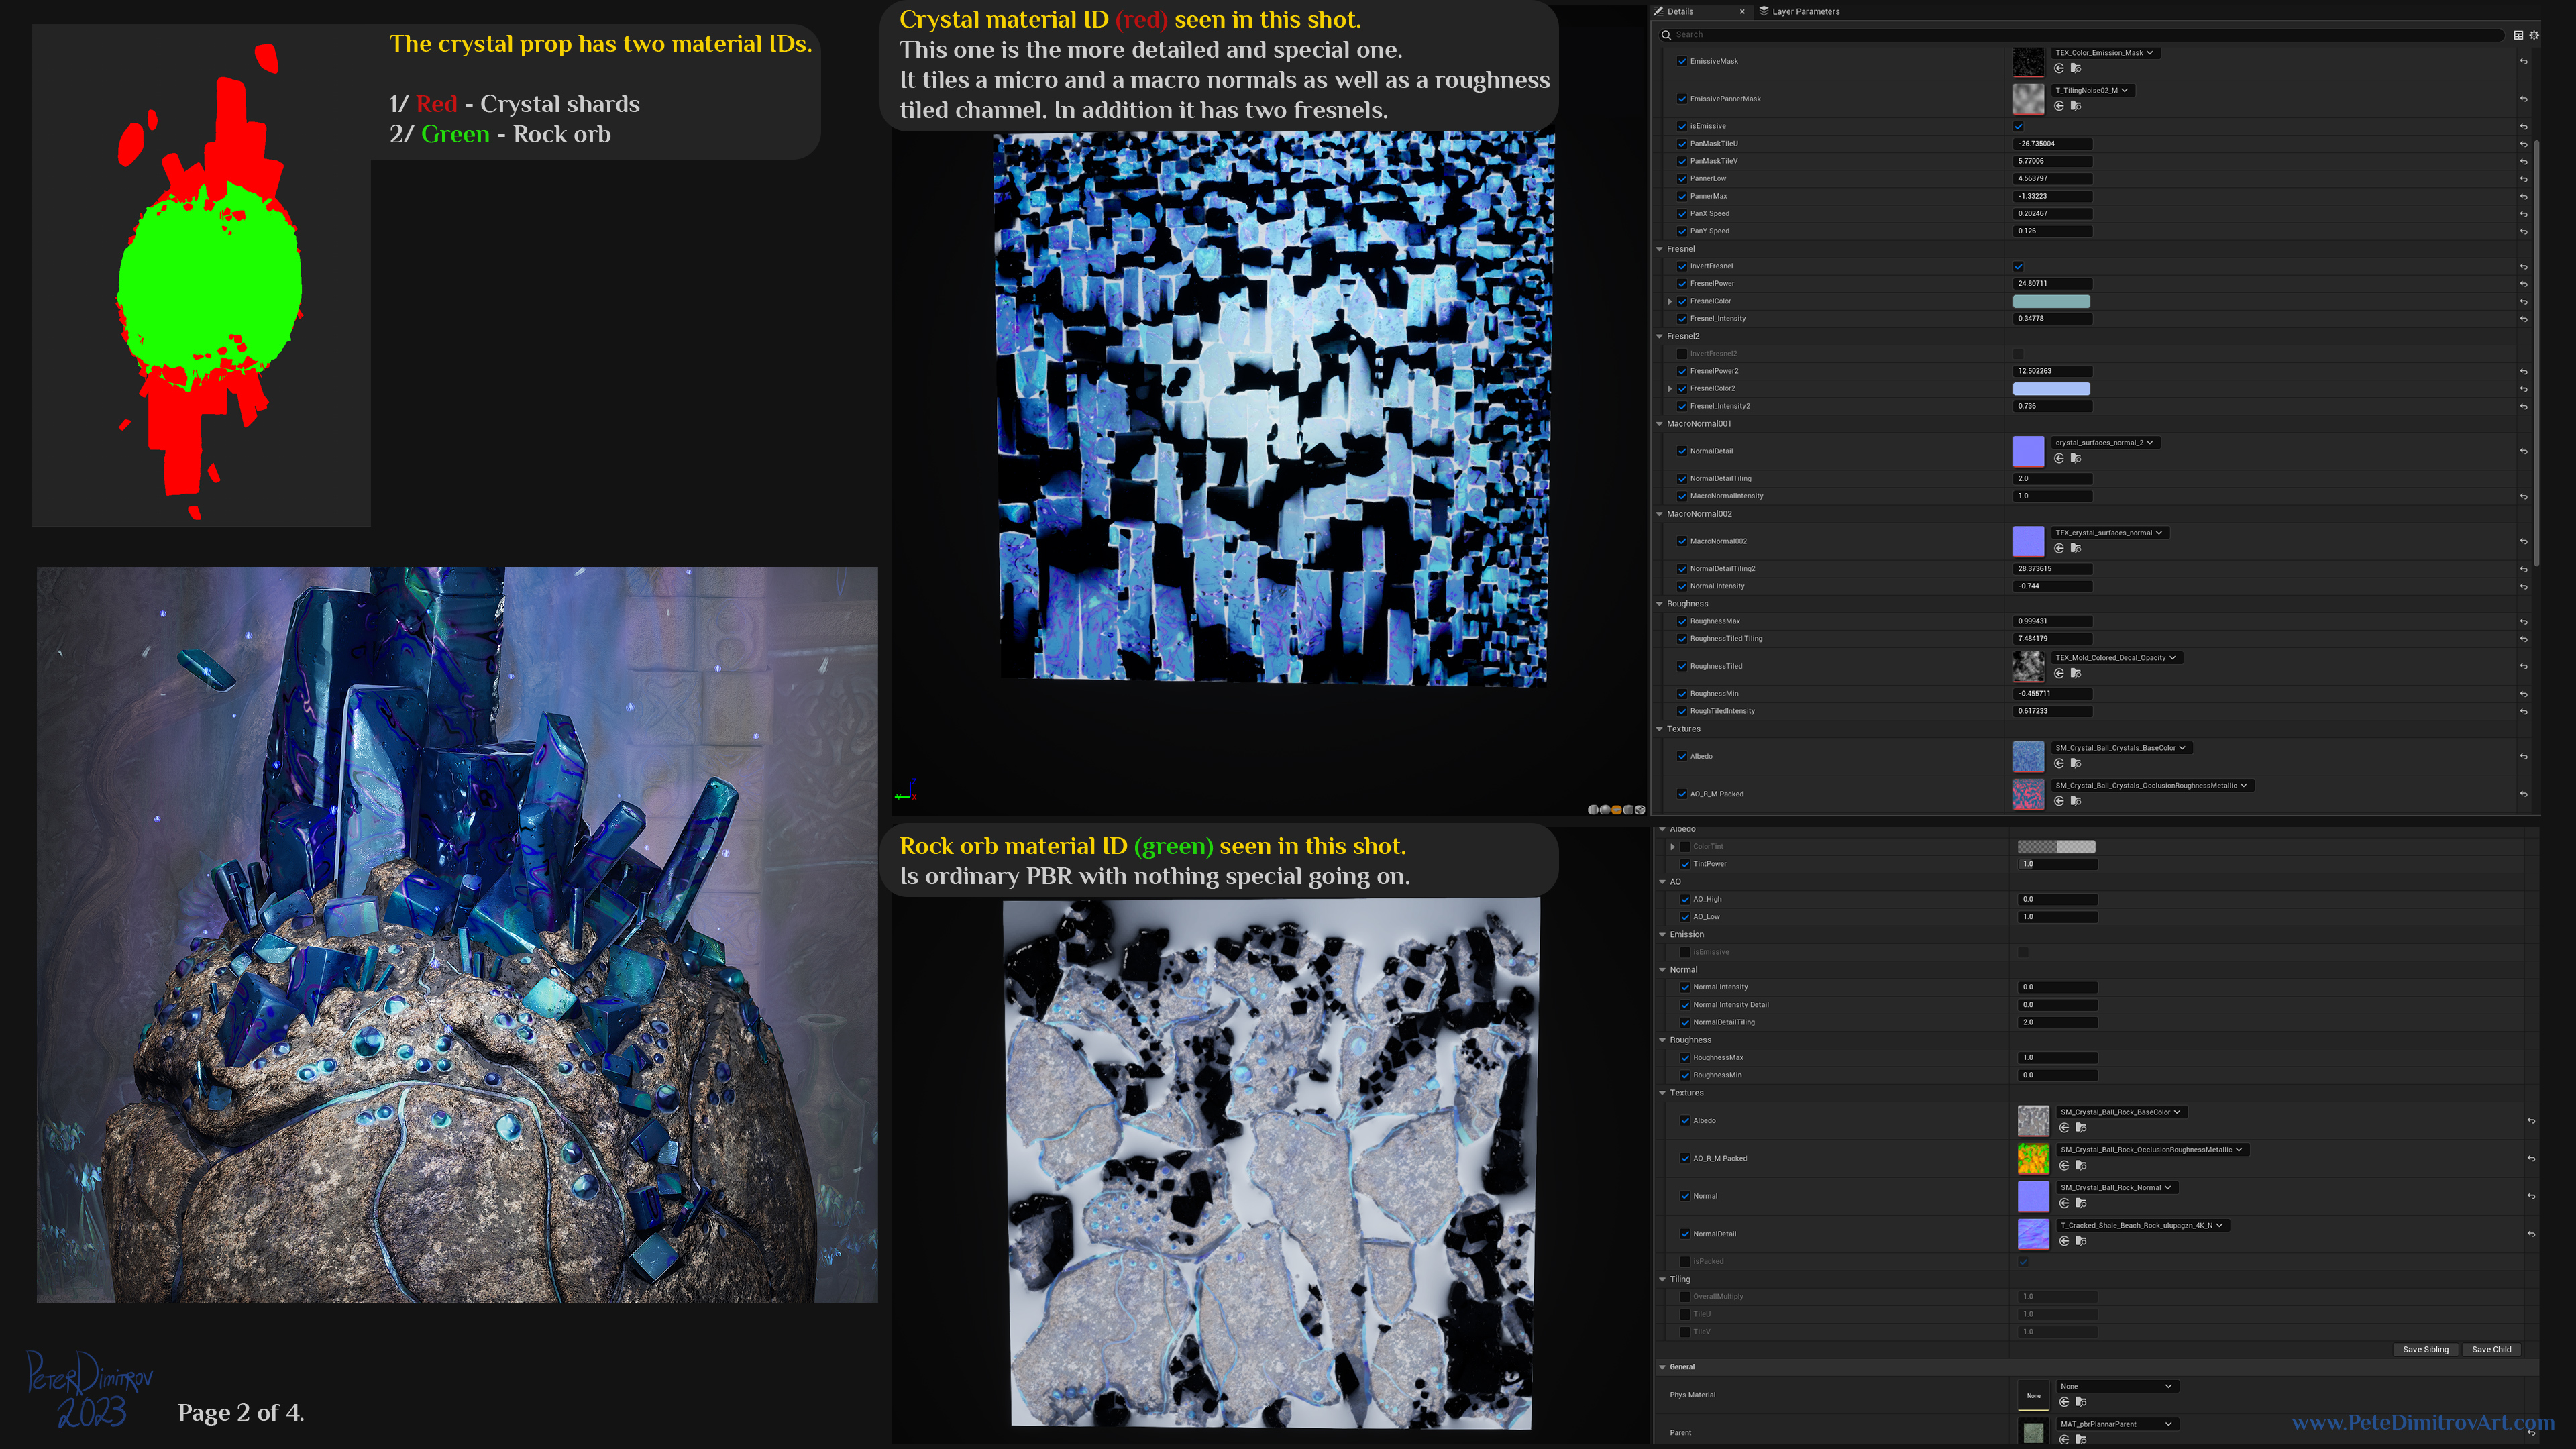
Crystal material ID (red) seen in this shot (blue image above with white splash in the middle). This one is the more detailed and a special one. It tiles a micro and a macro normals as well as a roughness tiled channel. In addition it has two fresnels.
Rock orb material ID (green) seen in this shot (gray image above). Is ordinary PBR with nothing special going on.
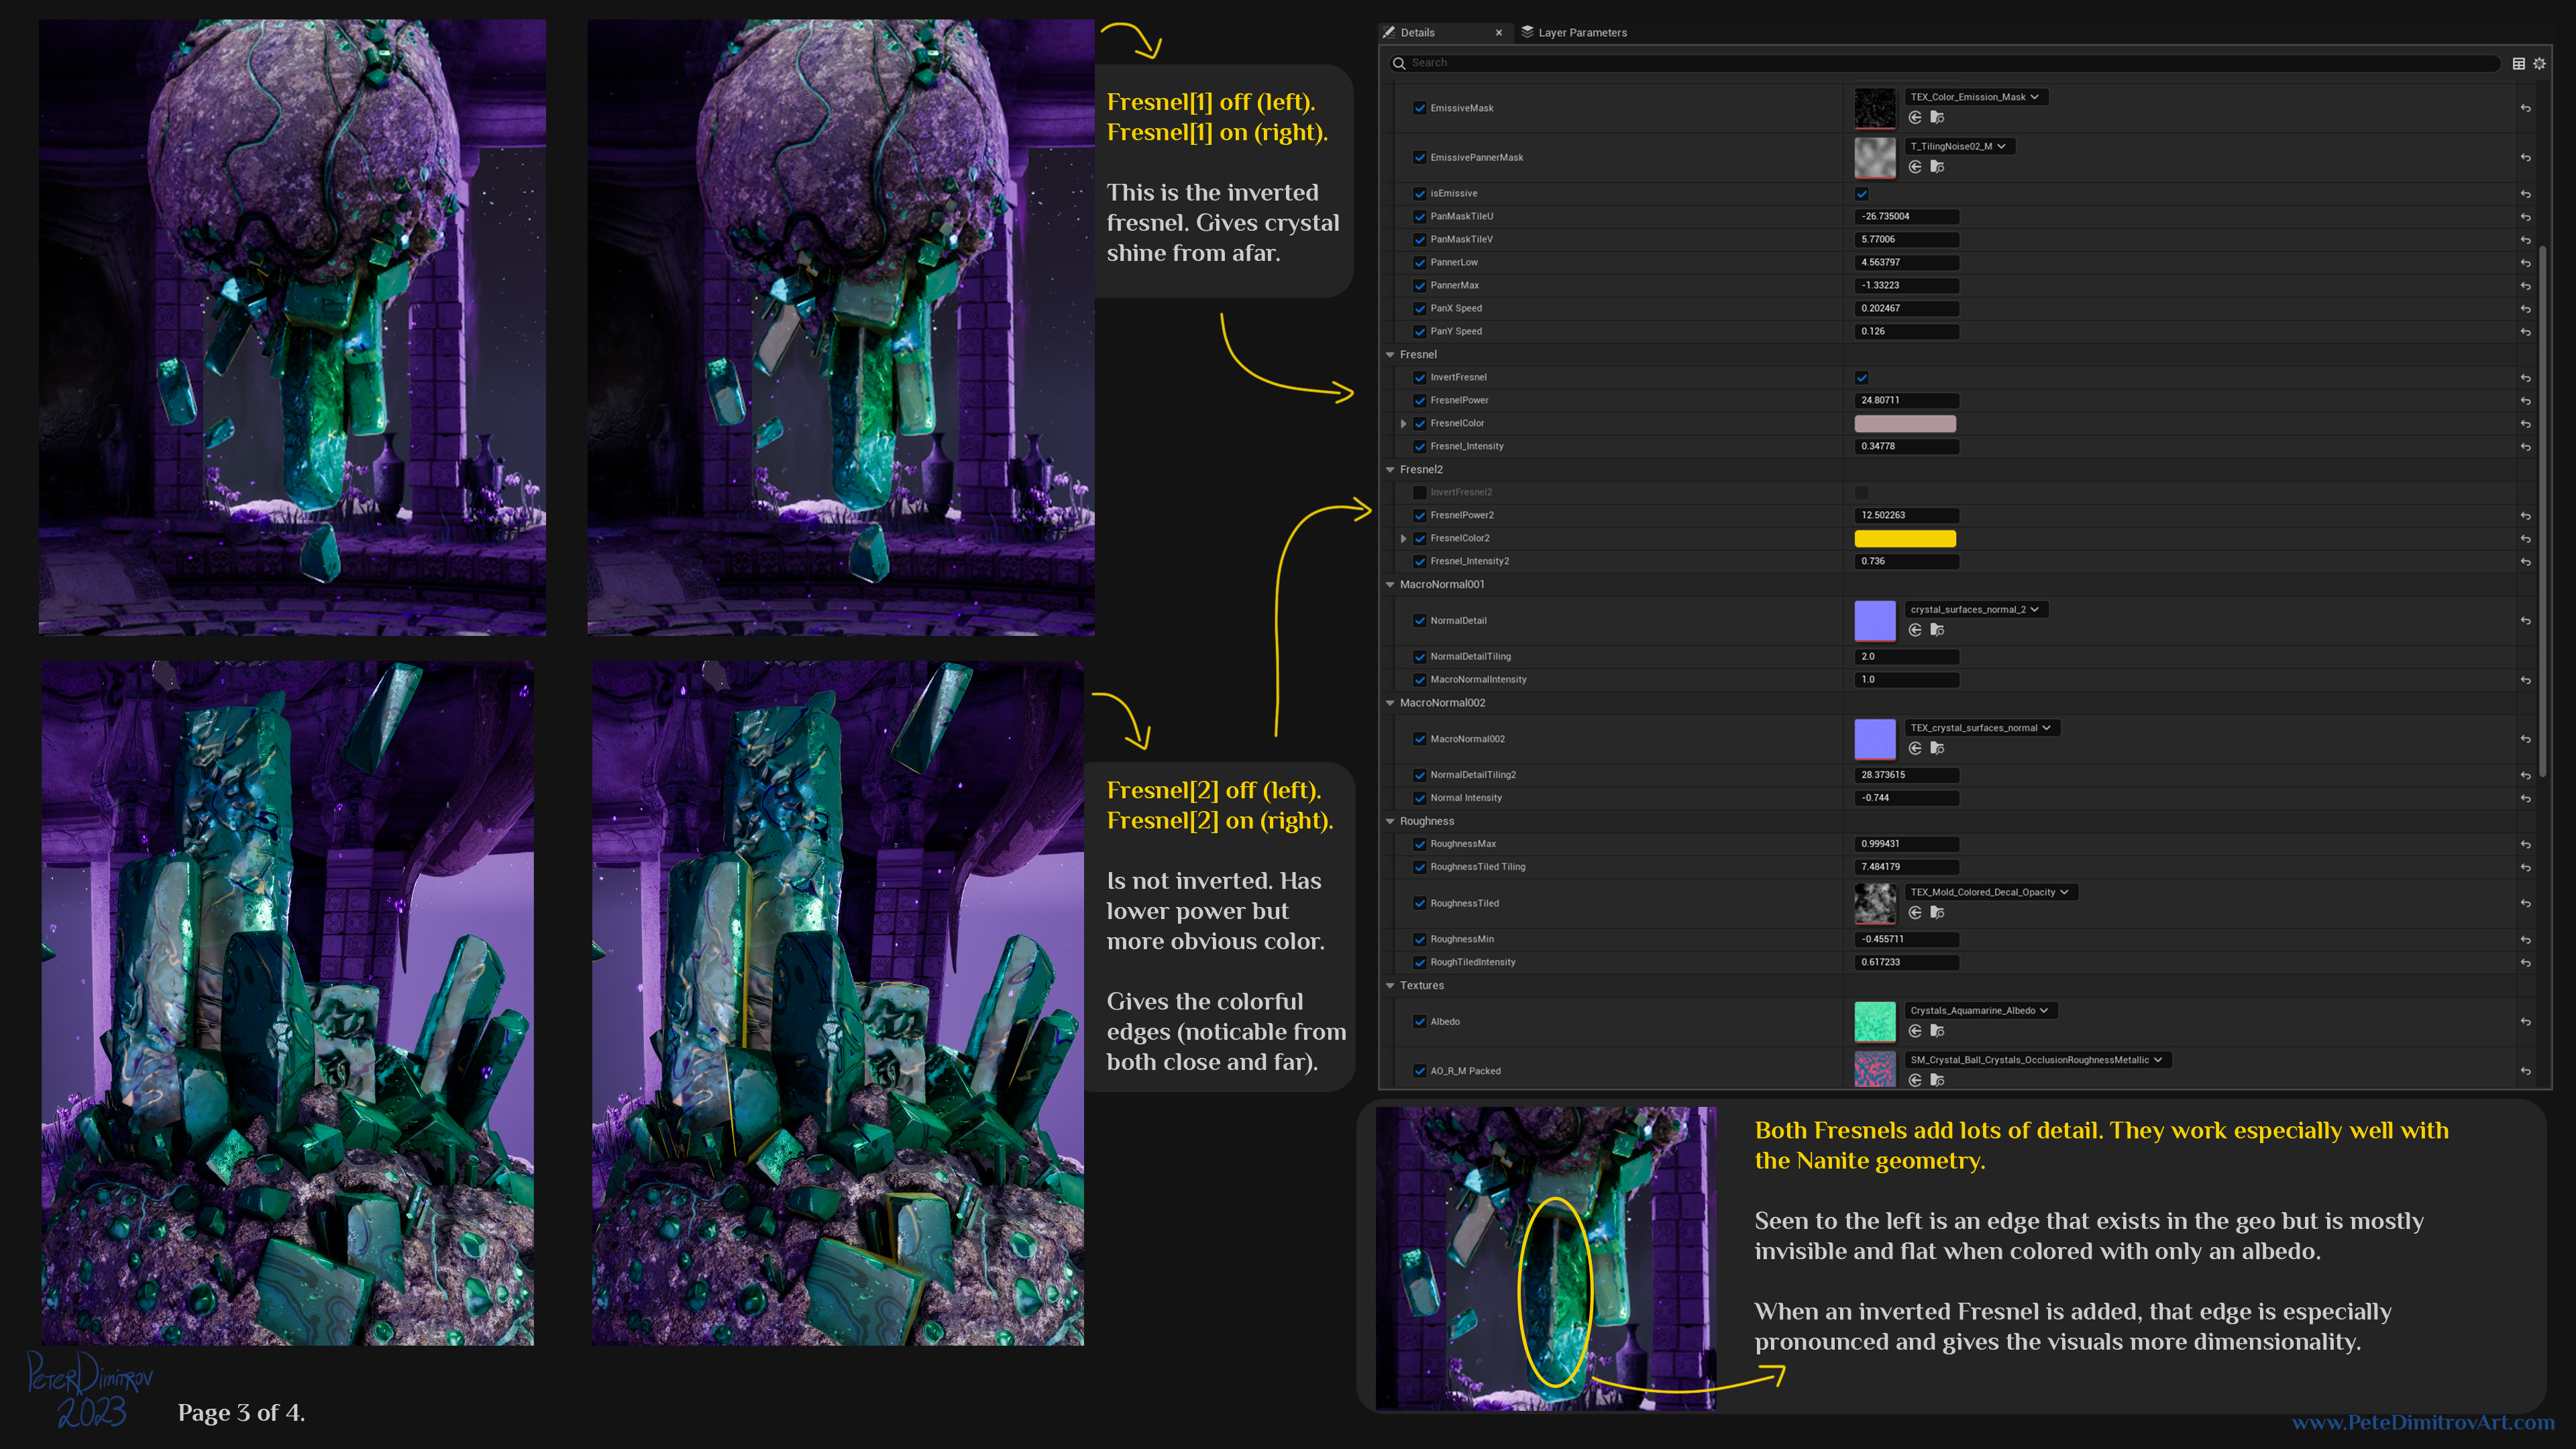
Fresnel[1] off (top left). Fresnel[1] on (top right). This is the inverted fresnel. Gives crystal shine from afar.
Fresnel[2] off (bottom first image in collage above). Fresnel[2] on (bottom second image in collage above). Is not inverted. Has lower power but more obvious color. Gives the colorful edges (noticeable from both close and far).
Both Fresnels add lots of detail. They work especially well with the Nanite geometry. Seen to the left is an edge that exists in the geo but is mostly invisible and flat when colored with only an albedo. When an inverted Fresnel is added, that edge is especially pronounced and gives the visuals more dimensionality.
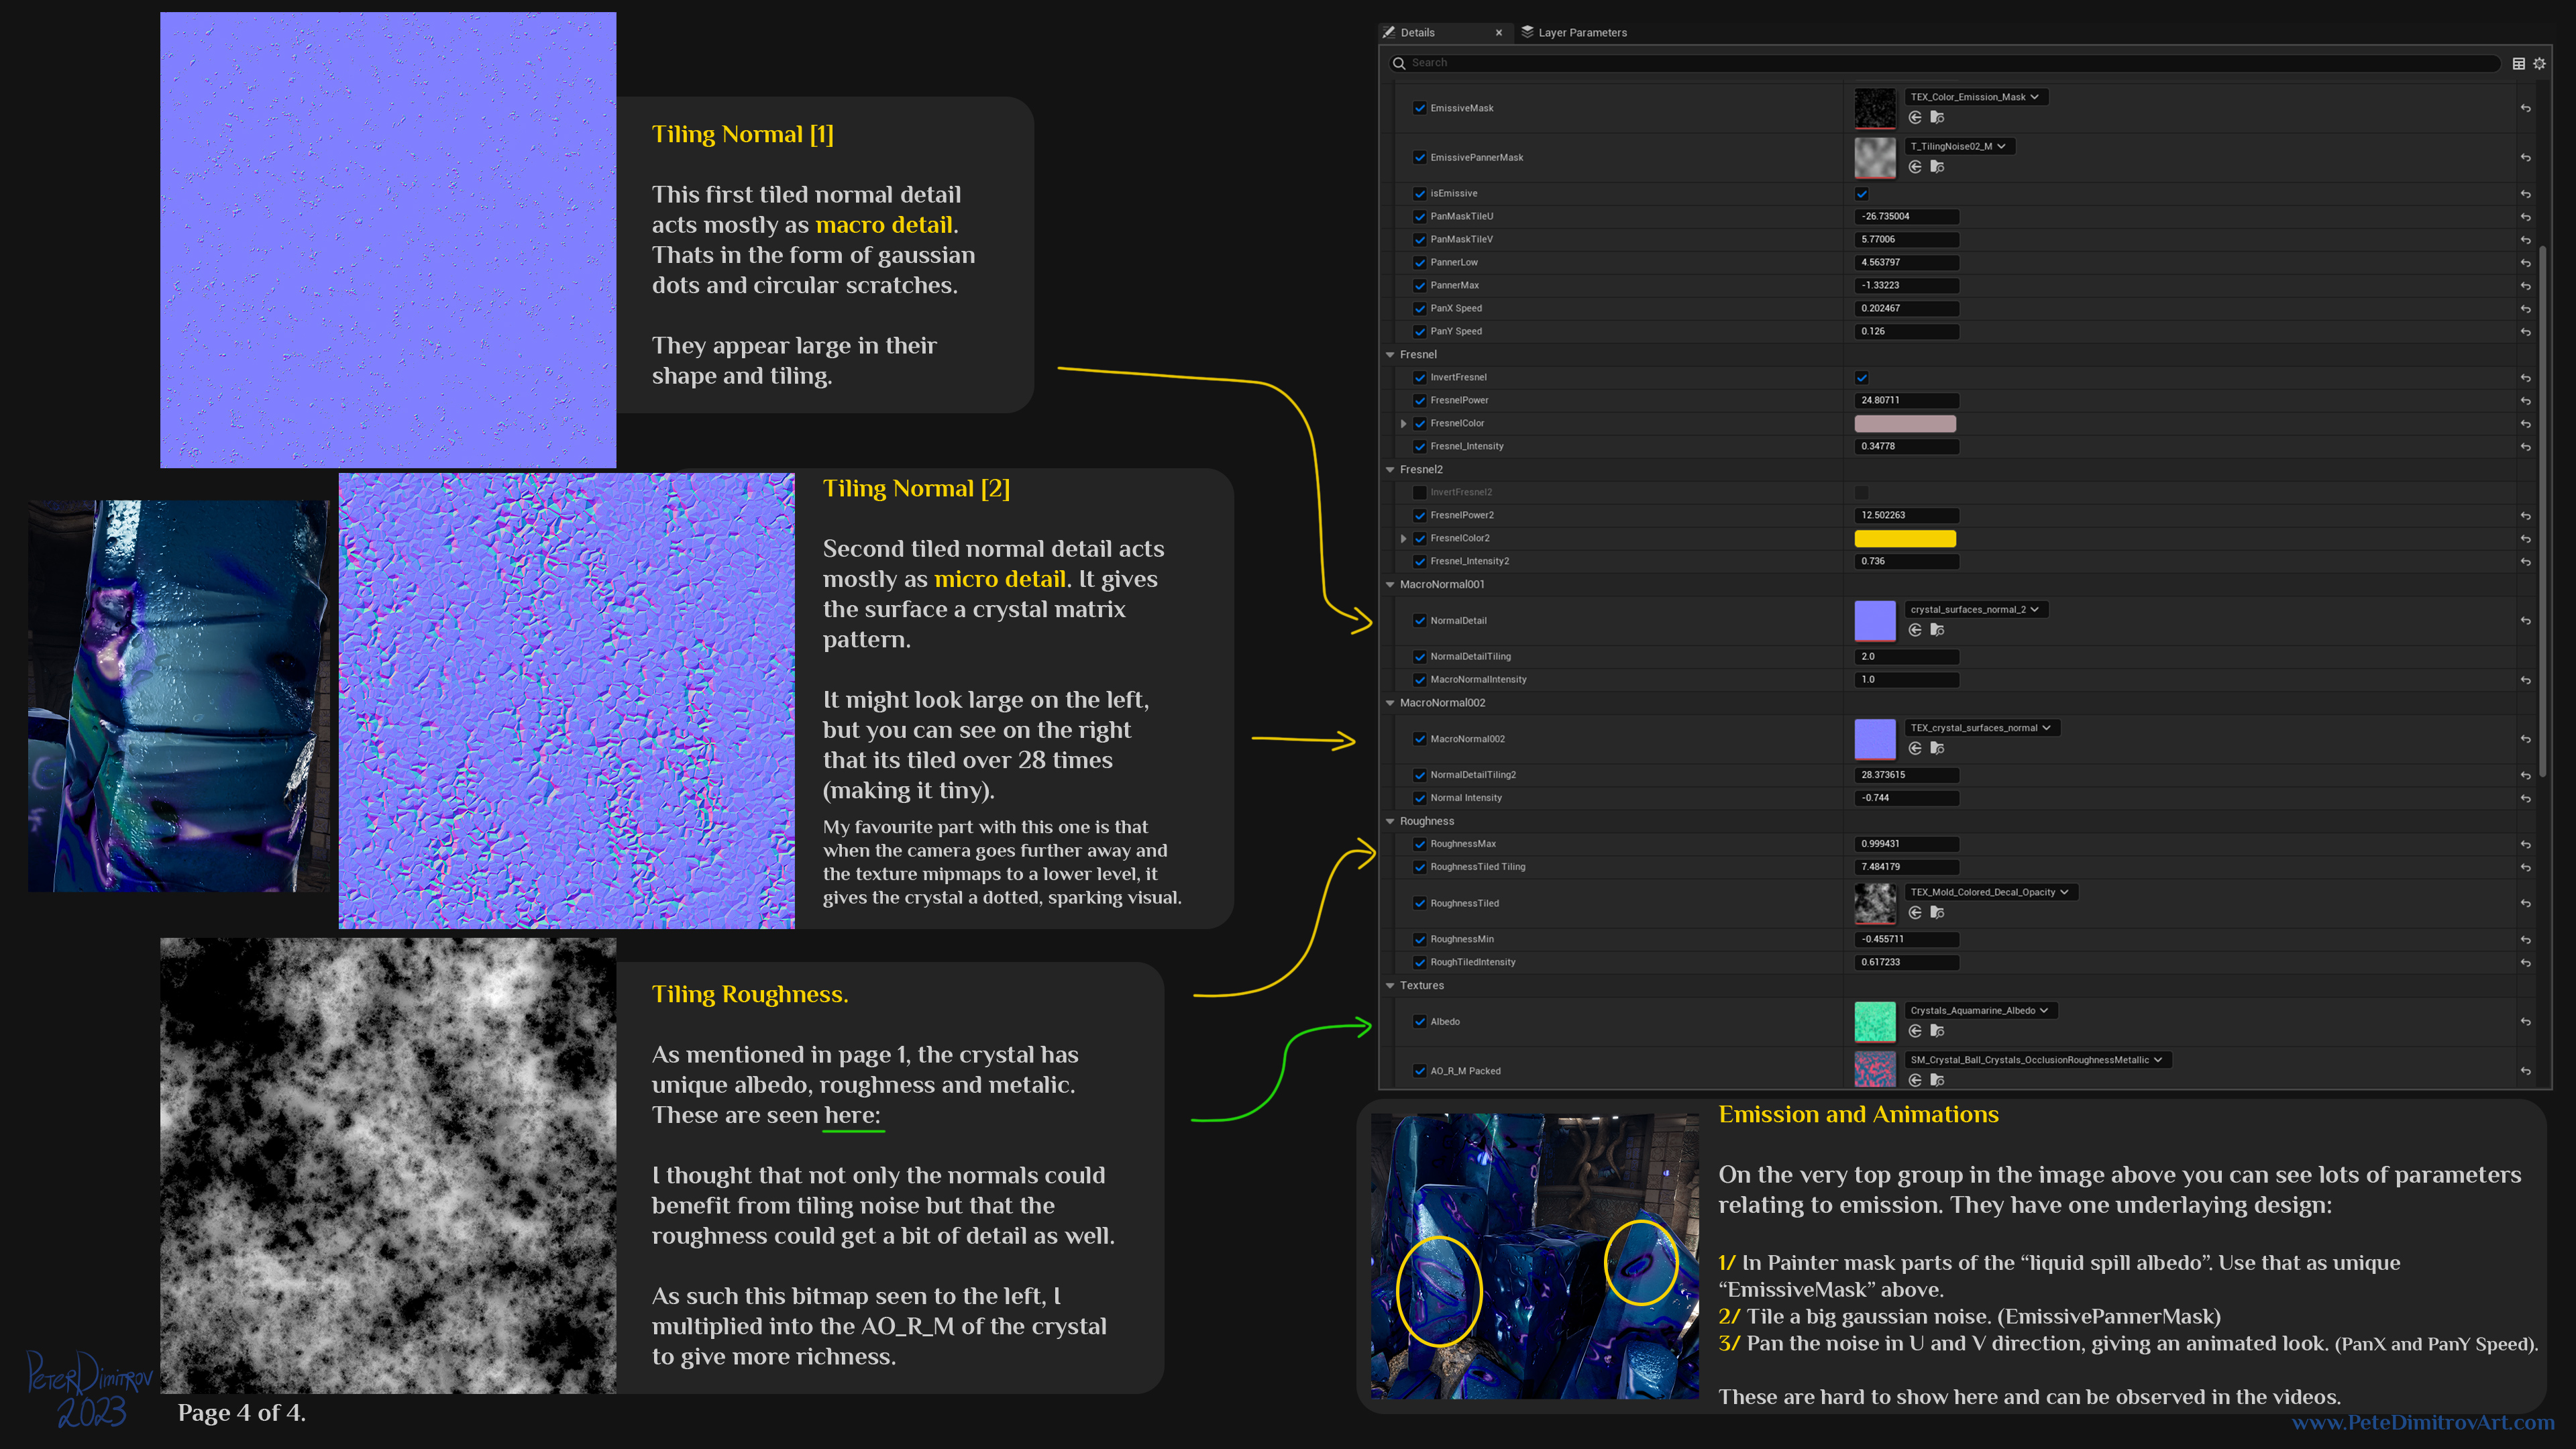
Tiling Normal [1]
This first tiled normal detail acts mostly as macro detail. Thats in the form of gaussian dots and circular scratches. They appear large in their shape and tiling.
Tiling Normal [2]
Second tiled normal detail acts mostly as micro detail. It gives the surface a crystal matrix pattern. It might look large on the left, but you can see on the right that its tiled over 28 times (making it tiny). My favourite part with this one is that when the camera goes further away and the texture mipmaps to a lower level, it gives the crystal a dotted, sparking visual.
Tiling Roughness
As mentioned in page 1 (thats image one), the crystal has unique albedo, roughness and metallic. These are seen here: (green arrow points to albedo and AO_R_M texture slots in the material)
I thought that not only the normals could benefit from tiling noise but that the roughness could get a bit of detail as well. As such this bitmap seen to the left, I multiplied into the AO_R_M of the crystal to give more richness.
Emission and Animations
On the very top group in the image above you can see lots of parameters relating to emission. They have one underlying design:
1/ In Painter mask parts of the “liquid spill albedo”. Use that as unique “EmissiveMask” above.
2/ Tile a big gaussian noise. (EmissivePannerMask)
3/ Pan the noise in U and V direction, giving an animated look. (PanX and PanY Speed).
These are hard to show here and can be observed in the videos (seen in albums below).
Artstation Albums
You can find the images above, and many more, in 4k, over at my Artstation. I ended up creating three albums as I could organize the tons of screenshots better that way.
- Environment - https://www.artstation.com/artwork/04Ved8
- Crystal Prop - https://www.artstation.com/artwork/Ke52ky
- Assets Breakdown - https://www.artstation.com/artwork/lD4Z4z
Cinematic
Together with Hayley Rumbold we also finished up our cinematic work a month and a bit ago. If you haven’t seen it, check it out here.
You can also see some behind the scenes images on the topic of the cinematic over at Hayley’s website.
Conclusion
The four images showed a breakdown of how I accomplished to create a detailed crystal prop inside Unreal 5. The different pieces that make up the final visual were taken apart. Comparison of some effects being on and off were shown. Some of the bitmaps used were also previewed. With all of that, hopefully you learned something new and got ideas and inspiration of how to approach the geometry and texture work when it comes to your own props.
If you enjoyed this blog post, consider subscribing in the form below. That way you will get a notification the next time I publish a new blog.
All the best,
Pete.